Use an optional flash unit for additional lighting when shooting at night or indoors under low light.
Remove the hot shoe cover and slide the flash onto the hot shoe.
Turn the flash on.
For more information, see the documentation provided with the flash unit.
The options available vary with the flash unit.
Select [FLASH FUNCTION SETTING] in the [FLASH SETTING] menu.
If the flash is not on, sync terminal options will be displayed. Turn the flash on before adjusting settings.
Highlight items using the selector and rotate the rear command dial to change the highlighted setting.
Press [DISP/BACK] to put the changes into effect.
Depending on the distance to the subject, some lenses may cast shadows in photos taken with the flash.
The flash will not fire at some settings, for example when the electronic shutter is used.
Choose shutter speeds slower than [250X] when using the flash in exposure mode [S] (shutter-priority AE) or manual ([M]).
In TTL mode, the flash may fire several times with each shot. Do not move the camera until shooting is complete.
Red-Eye Removal
Red-eye removal is available when an option other than [OFF] is selected for [FLASH SETTING] > [RED EYE REMOVAL] and [AF/MF SETTING] > [FACE/EYE DETECTION SETTING] is [ON]. Red-eye removal minimizes “red-eye” caused when light from the flash is reflected from the subject’s retinas.
Flash Sync Speed
The flash will synchronize with the shutter at shutter speeds of 1/250 s or slower.
Optional Flash Units
The camera can be used with optional FUJIFILM shoe-mounted flash units. Do not use third-party flash units that apply over 300 V to the camera hot shoe.
The Sync Terminal
Use the sync terminal to connect flash units that require a sync cable.
External flash units are more powerful than their built-in counterparts. Some support high-speed sync (FP) and can be used at shutter speeds faster than the flash sync speed, while others can function as master flash units controlling remote units via optical wireless flash control.
Test firing may sometimes be unavailable, for example when the camera setup menu is displayed.
Connect the flash unit and select [FLASH SETTING] > [FLASH FUNCTION SETTING] in the camera shooting menu to display flash options. The options available vary with the status of the connected unit.
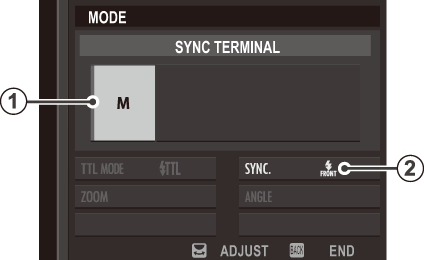
[SYNC TERMINAL] will be also displayed if an incompatible flash unit or no flash unit is connected.
Third-party studio flash commanders compatible with the FUJIFILM flash system can now be used. For more information, see the documentation provided your studio flash unit.
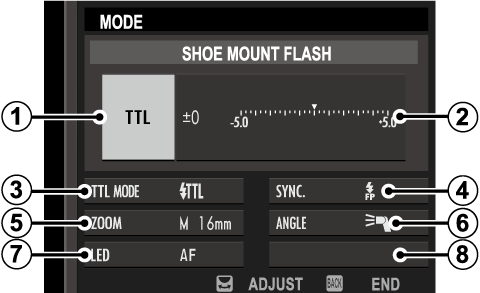
The following options are available with optional shoe-mounted flash units.

 Flash control mode
The flash control mode selected with the flash unit. This can in some cases be adjusted from the camera; the options available vary with the flash.
 ).
). ).
). Flash compensation/output
The options available vary with flash control mode.
 Flash mode (TTL)
Choose a flash mode for TTL flash control. The options available vary with the shooting mode ([P], [S], [A], or [M]) selected.
 icon displayed when the shutter button is pressed halfway indicates that the flash will fire when the photo is taken.
 Sync
Sync
Control flash timing.
 Zoom
Zoom
The angle of illumination (flash coverage) for units that support flash zoom. Some units allow the adjustment to be made from the camera. If [AUTO] is selected, zoom will automatically be adjusted to match coverage to lens focal length.
 Lighting
If the unit supports this feature, choose from the options below.
![]() LED light
LED light
Choose how the built-in LED light functions during still photography (compatible units only). It can function as a catchlight (/[CATCHLIGHT]), as an AF-assist illuminator (
/[AF ASSIST]), or as both a catchlight and an AF-ASSIST illuminator (
/[AF ASSIST+CATCHLIGHT]). Choose [OFF] to disable the LED during photography.
 Number of flashes
Choose the number of times the flash fires each time the shutter is released in [MULTI] mode. Full value may not be applied if limits of flash control system are exceeded.
 Frequency
Choose the frequency at which the flash fires in [MULTI] mode. Full value may not be applied if limits of flash control system are exceeded.
Displayed when the EF-X8 flash unit supplied with FUJIFILM X-T1 and X-T2 cameras is connected and raised.

 Flash control mode
Choose from the following options.
 ) and choose a flash mode (
 ).
). ) regardless of subject brightness or camera settings. Output is expressed in fractions of full power, from 1/1 to 1/64. The desired results may not be achieved at low values if they exceed the limits of the flash control system; take a test shot and check the results.
 Flash compensation/output
Adjust flash level. The options available vary with the flash control mode ( )
)
 Flash mode (TTL)
Choose a flash mode for TTL flash control. The options available vary with the shooting mode ([P], [S], [A], or [M]) selected.
 icon displayed when the shutter button is pressed halfway indicates that the flash will fire when the photo is taken.
 Sync
Sync
Choose whether the flash is timed to fire immediately after the shutter opens (/[1ST CURTAIN]) or immediately before it closes (
/[2ND CURTAIN]). [1ST CURTAIN] is recommended in most circumstances.
The following options are available when no compatible flash unit is connected or if a unit is connected via the sync terminal or uses only the X-contact on the hot shoe.

 Flash control mode
Choose from the following options:
 Sync
Sync
Choose whether the flash is timed to fire immediately after the shutter opens (/[1ST CURTAIN]) or immediately before it closes (
/[2ND CURTAIN]). [1ST CURTAIN] is recommended in most circumstances.
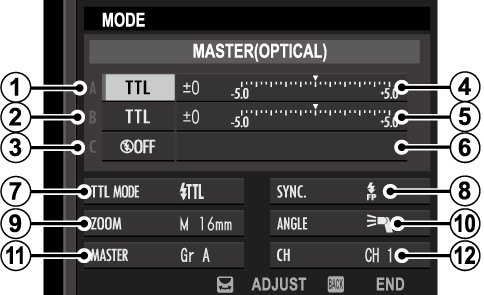
The options will be displayed if the unit is currently functioning as master flash for FUJIFILM optical wireless remote flash control.

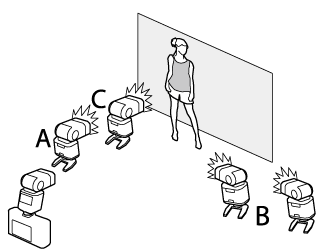
The master and remote units can be placed in up to three groups (A, B, and C) and flash mode and flash level adjusted separately for each group. Four channels are available for communication between the units; separate channels can be used for different flash systems or to prevent interference when multiple systems are operating in close proximity.

 Flash control mode (group A)
 Flash control mode (group B)
 Flash control mode (group C)
Choose flash control modes for groups A, B, and C. [TTL%] is available for groups A and B only.
 Flash compensation/output (group A)
 Flash compensation/output (group B)
 Flash compensation/output (group C)
Adjust flash level for the selected group according to option selected for flash control mode. Note that the full value may not be applied if the limits of the flash control system are exceeded.
 Flash mode (TTL)
Choose a flash mode for TTL flash control.The options available vary with the shooting mode ([P], [S], [A], or [M]) selected.
 icon displayed when the shutter button is pressed halfway indicates that the flash will fire when the photo is taken.
 Sync
Sync
Control flash timing.
 Zoom
Zoom
The angle of illumination (flash coverage) for units that support flash zoom. Some units allow the adjustment to be made from the camera. If [AUTO] is selected, zoom will automatically be adjusted to match coverage to lens focal length.
 Lighting
If the unit supports this feature, choose from the options below.
 Master
Assign the master flash to group A ([Gr A]), B ([Gr B]), or C ([Gr C]). If [OFF] is selected, output from the master flash will be held to a level that does not affect the final picture. Available only if the unit is mounted on the camera hot shoe as a master flash for FUJIFILM optical wireless remote flash control in [TTL], [TTL%], or [M] mode.
 Number of flashes
Choose the number of times the flash fires each time the shutter is released in [MULTI] mode.
 Channel
Choose the channel used by the master flash for communication with the remote flash units. Separate channels can be used for different flash systems or to prevent interference when multiple systems are operating in close proximity.
 Frequency
Choose the frequency at which the flash fires in [MULTI] mode.