.
.HThe Shooting Menus ([IMAGE QUALITY SETTING])
Adjust image quality settings.
To display image quality settings, press [MENU]/[OK] in the shooting display and select the H ([IMAGE QUALITY SETTING]) tab.
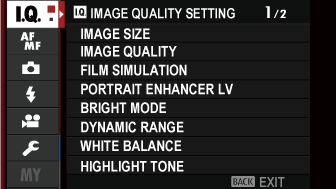
The options available vary with the shooting mode selected.
[IMAGE SIZE]
Choose the size and aspect ratio at which still pictures are recorded.
| Option (Image size) | |||
|---|---|---|---|
| O[4:3] (5328 × 4000) |
O[3:2] (6000 × 4000) |
O[16:9] (6000 × 3376) |
O[1:1] (4000 × 4000) |
| P[4:3] (3712 × 2784) |
P[3:2] (4240 × 2832) |
P[16:9] (4240 × 2384) |
P[1:1] (2832 × 2832) |
| Q[4:3] (2656 × 1992) |
Q[3:2] (3008 × 2000) |
Q[16:9] (3008 × 1688) |
Q[1:1] (2000 × 2000) |
[IMAGE SIZE] is not reset when the camera is turned off or another shooting mode is selected.
[IMAGE QUALITY]
Choose a file format and compression ratio.
| Option | Description |
|---|---|
| [FINE] | Lower compression ratios are used for higher-quality images. |
| [NORMAL] | Higher compression ratios are used to increase the number of images that can be stored. |
| [FINE+RAW] | Record both RAW and fine-quality JPEG images. |
| [NORMAL+RAW] | Record both RAW and normal-quality JPEG images. |
| [RAW] | Record RAW images only. |
The Function Buttons
To toggle RAW image quality on or off for a single shot, assign [RAW] to a function button (aAssigning Roles to the Function Buttons). Press the button once to select the option in the right column, again to return to the original setting (left column).
| Option currently selected for [IMAGE QUALITY] | Option selected by pressing function button to which [RAW] is assigned |
|---|---|
| [FINE] | [FINE+RAW] |
| [NORMAL] | [NORMAL+RAW] |
| [FINE+RAW] | [FINE] |
| [NORMAL+RAW] | [NORMAL] |
| [RAW] | [FINE] |
[FILM SIMULATION]
Simulate the effects of different kinds of film, including black-and-white (with or without color filters). Choose a palette according to your subject and creative intent.
| Option | Description |
|---|---|
| c [PROVIA/STANDARD] |
Standard color reproduction. Suited to a wide range of subjects, from portraits to landscapes. |
| d [Velvia/VIVID] |
A high-contrast palette of saturated colors, suited to nature photos. |
| e [ASTIA/SOFT] |
Enhances the range of hues available for skin tones in portraits while preserving the bright blues of daylight skies. Recommended for outdoor portrait photography. |
| i [CLASSIC CHROME] |
Soft color and enhanced shadow contrast for a calm look. |
| g [PRO Neg. Hi] |
Offers slightly more contrast than h ([PRO Neg. Std]). Recommended for outdoor portrait photography. |
| h [PRO Neg. Std] |
A soft-toned palette. The range of hues available for skin tones is enhanced, making this a good choice for studio portrait photography. |
| b [MONOCHROME] |
Take pictures in standard black and white. |
| e [MONOCHROME + Ye FILTER] |
Take black-and-white pictures with slightly increased contrast. This setting also slightly tones down the brightness of the sky. |
| d [MONOCHROME + R FILTER] |
Take black-and-white pictures with increased contrast. This setting also tones down the brightness of the sky. |
| f [MONOCHROME + G FILTER] |
Soften skin tones in black-and-white portraits. |
| f [SEPIA] |
Take pictures in sepia. |
Film simulation options can be combined with tone and sharpness settings.
For more information, visit: “The World Of Film Simulation”
At default settings, film simulation is assigned to the touch menu [T.B. Fn2] button (aTouch Function Buttons).
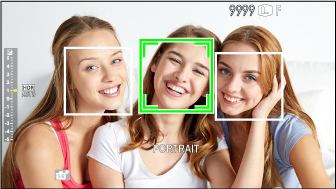
[PORTRAIT ENHANCER LV]
Choose the portrait enhancement level using a slider while previewing the effect in the display.

Select [FACE DETECTION ON] for G[AF/MF SETTING] > [FACE/EYE DETECTION SETTING] when adjusting the portrait enhancement level.
[BRIGHT MODE]
Select [ON] to enable bright mode when shooting in S. Use bright mode to better capture details in highlights and shadows.
| Options | |
|---|---|
| [ON] | [OFF] |
[DYNAMIC RANGE]
Control contrast. Choose lower values to increase contrast when shooting indoors or under overcast skies, higher values to reduce loss of detail in highlights when photographing high-contrast scenes. Higher values are recommended for scenes that include both sunlight and deep shade, for such high-contrast subjects as sunlight on water, brightly-lit autumn leaves, and portraits taken against a blue sky, and for white objects or people wearing white.
| Options | |||
|---|---|---|---|
| [AUTO] | V[100%] | W[200%] | X[400%] |
Mottling may appear in pictures taken at higher values. Choose a value according to the scene.
If [AUTO] is selected, the camera will automatically choose either V[100%] or W[200%] according to the subject and shooting conditions. Shutter speed and aperture will be displayed when the shutter button is pressed halfway.
W[200%] is available at sensitivities of from ISO 400 to ISO 12800, X[400%] at sensitivities of from ISO 800 to 12800.
[WHITE BALANCE]
For natural colors, choose a white balance option that matches the light source (aWhite Balance).
[HIGHLIGHT TONE]
Adjust the appearance of highlights.
| Options | ||||
|---|---|---|---|---|
| [−2] | [−1] | [0] | [+1] | [+2] |
[SHADOW TONE]
Adjust the appearance of shadows.
| Options | ||||
|---|---|---|---|---|
| [−2] | [−1] | [0] | [+1] | [+2] |
[COLOR]
Adjust color density.
| Options | ||||
|---|---|---|---|---|
| [−2] | [−1] | [0] | [+1] | [+2] |
[SHARPNESS]
Sharpen or soften outlines.
| Options | ||||
|---|---|---|---|---|
| [−2] | [−1] | [0] | [+1] | [+2] |
[NOISE REDUCTION]
Reduce noise in pictures taken at high sensitivities.
| Options | ||||
|---|---|---|---|---|
| [−2] | [−1] | [0] | [+1] | [+2] |
[LONG EXPOSURE NR]
Select [ON] to reduce mottling in long time-exposures.
| Options | |
|---|---|
| [ON] | [OFF] |
[COLOR SPACE]
Choose the gamut of colors available for color reproduction.
| Options | Description |
|---|---|
| [sRGB] | Recommended in most situations. |
| [Adobe RGB] | For commercial printing. |