[SET-UP] 2 (H)
Adjust basic camera settings.
To access basic camera settings, press [MENU/OK] and select tab H.
F [FUNCTION (Fn) SETTING]
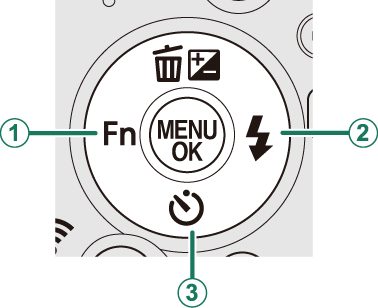
Choose the roles assigned to the left ([Fn]/function, A), right (N/flash, B), and down (h/self-timer, C) buttons on the selector (a Assigning a Role to the Function Buttons).

Z [POWER MANAGEMENT]
Adjust power management settings.
[AUTO POWER OFF]
Choose the length of time before the camera turns off automatically when no operations are performed. Shorter times increase battery life; if [OFF] is selected, the camera must be turned off manually.
| Options | ||
|---|---|---|
| [5 MIN] | [2 MIN] | [OFF] |
[HIGH PERFORMANCE]
Select [ON] for faster focus and to reduce the time needed to restart the camera.
| Options | |
|---|---|
| [ON] | [OFF] |
t [SAVE DATA SET-UP]
Adjust file management settings.
[FRAME NO.]
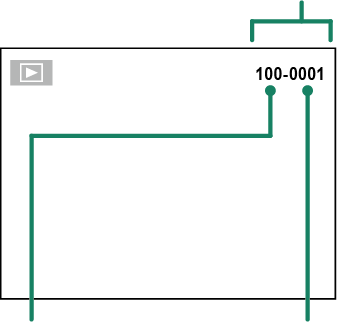
New pictures are stored in image files named using a four-digit file number assigned by adding one to the last file number used. The file number is displayed during playback as shown. [FRAME NO.] controls whether file numbering is reset to 0001 when a new memory card is inserted or the current memory card or internal memory is formatted.
Frame number

| Directory number | File number |
| Option | Description |
|---|---|
| [CONTINUOUS] | Numbering continues from the last file number used or the first available file number, whichever is higher. Choose this option to reduce the number of pictures with duplicate file names. |
| [RENEW] | Numbering is reset to 0001 after formatting or when a new memory card is inserted. |
If the frame number reaches 999-9999, the shutter release will be disabled. Format the memory card after transferring to a computer any pictures you wish to keep.
Selecting R [RESET] sets [FRAME NO.] to [CONTINUOUS] but does not reset the file number.
Frame numbers for pictures taken with other cameras may differ.
[DATE STAMP]
Stamp the time and/or date of recording on photographs as they are taken.
| Option | Description |
|---|---|
| R+S | Stamp new photographs with the date and time of recording. |
| R | Stamp new photographs with the date of recording. |
| [OFF] | Do not stamp the time and date on new photographs. |
Time and date stamps cannot be deleted. Turn [DATE STAMP] off to prevent time and date stamps appearing on new photographs.
If the camera clock is not set, you will be prompted to set the clock to the current date and time (a Basic Setup, Changing the Time and Date).
We recommend that you turn the DPOF “print date” option off when printing images with a time and date stamp (a [PRINT ORDER (DPOF)]).
Time and date stamps do not appear on movies or panoramas or on shots taken using 4K burst.
r [CONNECTION SETTING]
Adjust settings for connection to wireless devices, including smartphones, computers, and Fujifilm instax SHARE printers.
For more information on wireless connections, visit:
[Bluetooth SETTINGS]
Adjust Bluetooth settings.
| Option | Description |
|---|---|
| [PAIRING REGISTRATION] | To pair the camera with a smartphone or tablet, select this option, then launch FUJIFILM Camera Remote on the smart device and tap [PAIRING REGISTRATION]. |
| [SELECT PAIRING DESTINATION] | Choose a connection from a list of devices with which the camera has been paired using [PAIRING REGISTRATION]. Select [NO CONNECTION] to exit without connecting. |
| [DELETE PAIRING REG.] | Delete pairing information for selected devices. Choose the device in the device list. The selected device will also be removed from the devices listed in [SELECT PAIRING DESTINATION]. |
| [Bluetooth ON/OFF] |
|
| [AUTO IMAGE TAGGING] |
|
| [SEAMLESS TRANSFER] |
|
| [SMARTPHONE SYNC. SETTING] |
Choose whether to synchronize the camera to the time and/or location provided by a paired smartphone.
|
Install the latest version of the FUJIFILM Camera Remote app on your smartphone or tablet before pairing the device with your camera or uploading images.
When [ON] is selected for both [Bluetooth ON/OFF] and [AUTO IMAGE TAGGING] and [OFF] is chosen for [SEAMLESS TRANSFER], upload to paired devices will begin when the camera is turned off or shortly after you exit to playback.
If [AUTO IMAGE TAGGING] is off, pictures can be marked for transfer using the U [IMAGE TRANSFER ORDER] option in the playback menu.
[PC AUTO SAVE]
Adjust settings for connection to computers via wireless LAN.
| Option | Description |
|---|---|
| [PC AUTO SAVE SETTING] |
Choose the method used for connection to computers via a wireless LAN.
|
| [DELETE REGISTERED DESTINATION PC] | Remove selected destinations. |
| [DETAILS OF PREVIOUS CONNECTION] | View computers to which the camera has recently connected. |
instax PRINTER CONNECTION SETTING
Adjust settings for connection to optional Fujifilm instax SHARE printers.
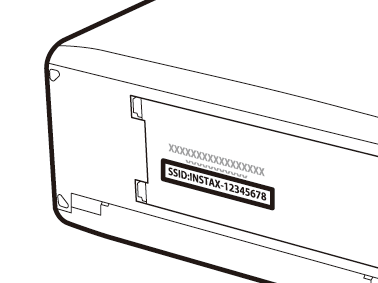
The Printer Name (SSID) and Password
The printer name (SSID) can be found on the bottom of the printer; the default password is “1111”. If you have already chosen a different password to print from a smartphone, enter that password instead.

[GENERAL SETTINGS]
Adjust settings for connection to wireless networks.
| Option | Description |
|---|---|
| [NAME] | Choose a name ([NAME]) to identify the camera on the wireless network (the camera is assigned a unique name by default). |
| [RESIZE IMAGE FOR SMARTPHONE] H |
Choose whether to resize images for upload to smartphones. Resizing applies only to the copy uploaded to the smartphone; the original is not affected.
|
| [GEOTAGGING] | Choose whether location data downloaded from a smartphone are embedded in pictures as they are taken. |
| [LOCATION INFO] | Display the location data last downloaded from a smartphone. |
| r[BUTTON SETTING] |
Choose the role played by the r (wireless transfer) button during playback or during shooting by the [Fn] button when it is assigned the [WIRELESS COMMUNICATION] function.
|
[INFORMATION]
View the camera’s MAC and Bluetooth address.
[RESET WIRELESS SETTING]
Restore wireless settings to their default values.
K [FORMAT]
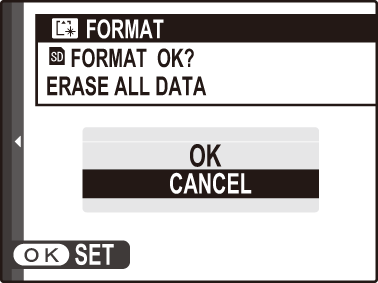
If a memory card is inserted in the camera, this option will format the memory card. If no memory card is inserted, this option will format internal memory.
-
Highlight K [FORMAT]in the setup menu and press [MENU/OK].
-
A confirmation dialog will be displayed. Highlight [OK] and press [MENU/OK] to format the memory card or internal memory.

To exit without formatting the memory card or internal memory, select [CANCEL] or press [DISP/BACK].
All data—including protected pictures—will be deleted from the memory card or internal memory. Be sure important files have been copied to a computer or other storage device.
Do not open the battery-chamber cover during formatting.

 .
.

