Connecting via USB
Before downloading pictures or taking pictures remotely, connect the camera to a computer and check that it functions normally.
- Connecting to Computers
- Copying Pictures to a Computer
- Connecting to Smartphones
- Converting RAW Images: FUJIFILM X RAW STUDIO
- Backing up and Restoring Camera Settings (FUJIFILM X Acquire)
Connecting to Computers
Connect the camera to a computer to download pictures or save RAW pictures in other formats.
-
Turn the computer on.
-
Adjust settings according to whether you will be copying pictures to a computer (Copying Pictures to a Computer), save RAW pictures in other formats (Converting RAW Images: FUJIFILM X RAW STUDIO), or Saving and Loading Camera Settings (Backing up and Restoring Camera Settings (FUJIFILM X Acquire)).
-
Turn the camera off.
-
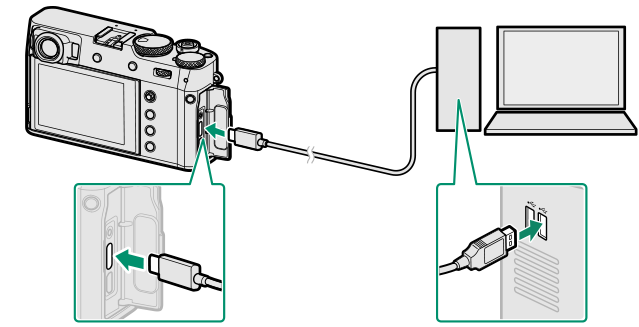
Connect a USB cable.

USB connector (Type-C) The USB cable must be no more than 1.5 m (4.9 ft.) long and be suitable for data transfer.
-
Turn the camera on.
-
Copy pictures to your computer.
- Image transfer: Use applications provided with your operating system.
- RAW conversion: Process RAW images using FUJIFILM X RAW STUDIO. The power of the camera’s image processing engine is used for rapid processing.
- Saving and loading camera settings: Use FUJIFILM X Acquire to save or load camera settings. Save your preferred settings to a file in a single operation and copy them to multiple cameras.
Turn the camera off before disconnecting the USB cable.
When connecting USB cables, be sure the connectors are fully inserted in the correct orientation. Connect the camera directly to the computer; do not use a USB hub or keyboard.
Loss of power during transfer could result in loss of data or damage to the memory card. Insert a fresh or fully-charged battery before connecting the camera.
If a memory card containing a large number of images is inserted, there may be a delay before the software starts and you may be unable to import or save images. Use a memory card reader to transfer pictures.
Make sure that the indicator lamp is off or lit green before turning the camera off.
Do not disconnect the USB cable while transfer is in progress. Failure to observe this precaution could result in loss of data or damage to the memory card.
Disconnect the camera before inserting or removing memory cards.
In some cases, it may not be possible to access pictures saved to a network server using the software in the same way as on a standalone computer.
Do not immediately remove the camera from the system or disconnect the USB cable once the message stating that copying is in progress clears from the computer display. If the number of images copied is very large, data transfer may continue after the message has ceased to be displayed.
The user bears all applicable fees charged by the phone company or Internet service provider when using services that require an Internet connection.
Copying Pictures to a Computer
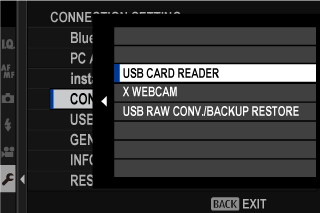
- Before copying pictures to a computer, select [USB CARD READER] for D [CONNECTION SETTING] > [CONNECTION MODE].
- The software that can be used to copy pictures varies with your computer operating system.

Mac OS X/macOS
Pictures can be copied to your computer using Image Capture (supplied with your computer) or other software.
Use a card reader to copy files over 4 GB in size.
Windows
Pictures can be copied to your computer using applications supplied with the operating system.
Connecting to Smartphones
To copy pictures to a smartphone, select [OFF] for D [CONNECTION SETTING] > [USB POWER SUPPLY SETTING] and connect the camera to the phone using a USB cable.
For Customers Using Android Devices
How you will connect the camera depends on the type of USB connector with which your smartphone is equipped.
Type-C
Ready a cable equipped with connectors matching the USB (Type-C) connector on the camera.

AThird-party USB cable
BType-C connector (male)
CType-C connector (male)
Micro-B
Use a USB on-the-go (OTG) cable.

ASupplied USB cable
BUSB OTG cable
CType-C connector (male)
DType-A connector (male)
EType-A connector (female)
FMicro-B connector (male)
The smartphone must support USB OTG.
The desired results cannot be achieved with a USB Type-C–to–Mirco-B cable. Use an OTG cable.
-
Set the camera’s D[CONNECTION SETTING] > [USB POWER SUPPLY SETTING] to [OFF].
-
Connect the camera and smartphone using a USB cable.
If the smartphone asks for permission for an application other than the “Camera Importer” to access the camera, tap “Cancel” and move on to the next step.
-
On your smartphone, tap the notification “Connected to USB PTP”.
-
From the recommended applications, select “Camera Importer”.
The app will automatically start and allow you to import photos and movies to your smartphone.
If the message “There is no MTP device connected” appears on the app, please try again from step 2.
For Customers Using iOS
An Apple Lightning to USB Camera Adapter is required.

Use an Apple Lightning to USB Camera Adapter
ASupplied USB cable
BApple Lightning to USB Camera Adapter
CType C connector (male)
DType-A connector (male)
-
Set the camera’s D [CONNECTION SETTING] > [USB POWER SUPPLY SETTING] to [OFF].
-
Connect the camera and smartphone using a USB cable. The “Photos” app will automatically start and allow you to import photos and movies to your smartphone.
The desired results cannot be achieved with a USB Type-C–to–Lightning cable. Use a camera adapter.
Converting RAW Images: FUJIFILM X RAW STUDIO
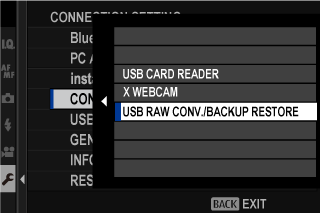
- Before proceeding, select [USB RAW CONV./BACKUP RESTORE] for D [CONNECTION SETTING] > [CONNECTION MODE] in the camera menus.
- FUJIFILM X RAW STUDIO can be used to convert RAW images to JPEG or TIFF images.

For more information on FUJIFILM X RAW STUDIO, see “Software for Use with Your Camera”.
Backing up and Restoring Camera Settings (FUJIFILM X Acquire)
- Before proceeding, select [USB RAW CONV./BACKUP RESTORE] for D[CONNECTION SETTING] > [CONNECTION MODE] in the camera menus.
- FUJIFILM X Acquire can be used to backup and restore camera settings.

For more information on FUJIFILM X Acquire, see “Software for Use with Your Camera”.

 .
.

