Recording Movies
This section describes how to film movies in auto mode.
-
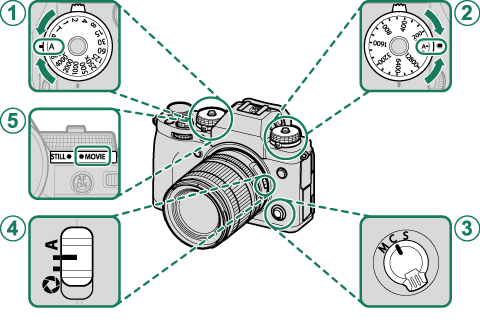
Adjust settings for program AE.

Setting A Shutter speed A (auto) (aP, S, A, and M Modes) B Sensitivity A (auto) (aSensitivity) C Focus mode C (AF-C) (aFocus Mode) D Aperture A (auto) (aP, S, A, and M Modes) E STILL/MOVIE mode dial MOVIE(aSTILL/MOVIE mode dial) To use the shutter speed and sensitivity dials, press the dial lock release and rotate the dial to the desired setting.
These settings can also be adjusted using touch controls (aMOVIE OPTIMIZED CONTROLoL).
-
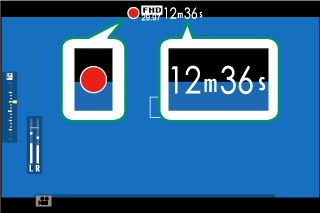
Press the shutter button to start recording. A recording indicator (V) and the time remaining are displayed while recording is in progress.

-
Press the button again to end recording. Recording ends automatically when the maximum length is reached or the memory card is full.
Using an External Microphone
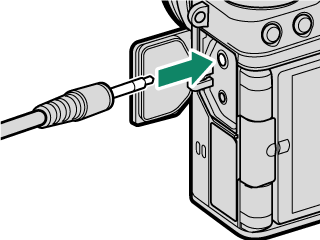
Sound can be recorded with external microphones that connect using jacks 3.5 mm in diameter; microphones that require plug-in power cannot be used. See the microphone manual for details.

XLR Microphone Adapters
The camera can be used with TEAC TASCAM CA-XLR2d-F XLR microphone adapters. For more information, visit the TASCAM website.
Sound is recorded via the built-in microphone or an optional external microphone. Do not cover the microphone during recording.
Note that the microphone may pick up lens noise and other sounds made by the camera during recording.
Vertical or horizontal streaks may appear in movies containing very bright subjects. This is normal and does not indicate a malfunction.
To monitor audio with headphones during recording, you will need to convert the USB connector to an audio jack using the supplied headphone adapter. The optional VG-XT4 vertical battery grip is also equipped with a headphone jack.
Adjusting Movie Settings
- Pressing MENU/OK when the STILL/MOVIE mode dial is rotated to MOVIE displays the movie menu.
- Frame size and rate can be selected using BMOVIE SETTING > MOVIE MODE.
- To choose the card used to store movies, use DSAVE DATA SET-UP > FCARD SLOT SETTING.
- Focus mode is selected using the focus mode selector; for continuous focus adjustment, select C, or choose S and enable Intelligent Face Detection. Intelligent Face Detection is not available in focus mode M.
Depth of Field
Choose low f-numbers to soften background details.
The indicator lamp lights while recording is in progress (the BMOVIE SETTING > TALLY LIGHT option can be used to choose the lamp—indicator or AF-assist—that lights during movie recording and whether the lamp blinks or remains steady). During recording, you can change exposure compensation by up to ±2 EV and adjust zoom using the zoom ring on the lens (if available).
If the lens is equipped with an aperture mode switch, select the aperture mode before beginning recording. If an option other than A is selected, shutter speed and aperture can be adjusted while recording is in progress.
While recording is in progress, you can:
- Adjust sensitivity
-
Refocus using any of the following methods:
- Press the shutter button halfway
- Press a function button to which AF-ON is assigned
- Use touch screen controls
- Display a histogram or artificial horizon by pressing the button to which HISTOGRAM or ELECTRONIC LEVEL has been assigned
Recording may be unavailable at some settings, while in other cases settings may not apply during recording.
To choose the focus area for movie recording, select GAF/MF SETTING > FFOCUS AREA and use the focus stick (focus lever) and rear command dial (aFocus-Point Selection).

 .
.

