DThe Setup Menus (CONNECTION SETTING)
Adjust settings for connection to other devices.
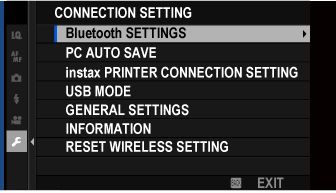
To access connection settings, press MENU/OK, select the D (SET UP) tab, and choose CONNECTION SETTING.

For more information on wireless connections, visit:
- Bluetooth SETTINGS
- PC AUTO SAVE
- instax PRINTER CONNECTION SETTING
- USB MODE
- GENERAL SETTINGS
- INFORMATION
- RESET WIRELESS SETTING
Bluetooth SETTINGS
Adjust Bluetooth settings.
PAIRING REGISTRATION
Pair the camera with a smartphone to which the FUJIFILM Camera Remote app has been installed.
SELECT PAIRING DESTINATION
Choose a connection from a list of devices with which the camera has been paired using PAIRING REGISTRATION. Select NO CONNECTION to exit without connecting.
DELETE PAIRING REG.
Delete pairing information for selected devices. Choose the device in the device list. The selected device will also be removed from the devices listed in SELECT PAIRING DESTINATION.
Bluetooth ON/OFF
| Option | Description |
|---|---|
| ON | The camera automatically establishes a Bluetooth connection with paired devices when turned on. |
| OFF | The camera does not connect via Bluetooth. |
AUTO IMAGE TAGGING
| Option | Description |
|---|---|
| ON | Mark JPEG images for upload as they are taken. |
| OFF | Photos are not marked for upload as they are taken. |
SEAMLESS TRANSFER
| Option | Description |
|---|---|
| ON | Pictures are uploaded to paired devices after shooting. |
| OFF | Pictures are uploaded to paired devices only when the camera is off or starting shortly after you exit to playback. |
SMARTPHONE SYNC. SETTING
Choose whether to synchronize the camera to the time and/or location provided by a paired smartphone.
| Option | Description |
|---|---|
| LOCATION &TIME | Synchronize the time and location. |
| LOCATION | Synchronize the location. |
| TIME | Synchronize the time. |
| OFF | Synchronization off. |
Install the latest version of the FUJIFILM Camera Remote app on your smartphone or tablet before pairing the device with your camera or uploading images.
When ON is selected for both Bluetooth ON/OFF and AUTO IMAGE TAGGING and OFF is chosen for SEAMLESS TRANSFER, upload to paired devices will begin when the camera is turned off or shortly after you exit to playback.
If AUTO IMAGE TAGGING is off, pictures can be marked for transfer using the IMAGE TRANSFER ORDER option in the playback menu.
PC AUTO SAVE
Adjust settings for connection to computers via wireless LAN.
PC AUTO SAVE SETTING
Choose the method used for connection to computers via a wireless LAN.
| Option | Description |
|---|---|
| SIMPLE SETUP | Connect using WPS. |
| MANUAL SETUP | Choose the network from a list (SELECT FROM NETWORK LIST) or enter the name manually (ENTER SSID). |
DELETE REGISTERED DESTINATION PC
Remove selected destinations.
DETAILS OF PREVIOUS CONNECTION
View computers to which the camera has recently connected.
instax PRINTER CONNECTION SETTING
Adjust settings for connection to optional Fujifilm instax SHARE printers.
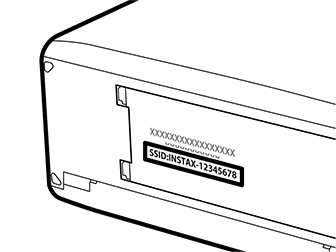
The Printer Name (SSID) and Password
The printer name (SSID) can be found on the bottom of the printer; the default password is “1111”. If you have already chosen a different password to print from a smartphone, enter that password instead.

USB MODE
Choose a mode for USB connections to computers, smartphones, and tablets.
| Option | Description |
|---|---|
| USB CARD READER | Pictures can be transferred when the camera is connected to a computer, smartphone, or tablet via USB. |
| USB WEBCAM | When connected to a computer via USB, the camera functions as a webcam. |
| OFF | Data transfer is disabled when the camera is connected to a computer, smartphone, or tablet via USB. |
Select USB CARD READER for USB MODE before connecting the USB cable to transfer pictures to a computer, smartphone, or tablet (aCopying Pictures to a Computer, aConnecting to Smartphones).
Select USB WEBCAM for USB MODE before connecting the camera for use as a webcam. “FUJIFILM X-T200” will be displayed when the computer detects the camera.
The webcam feature is supported under Windows 10 (x64), macOS 10.14 (Mojave), and macOS 10.15 (Catalina).
When USB WEBCAM is selected:
- HIMAGE QUALITY SETTING and ASHOOTING SETTING cannot be adjusted,
- apart from the ON/OFF button and rear command dial (which can be used only for exposure compensation), camera controls cannot be used,
- GAF/MF SETTING > PRE-AF is fixed at ON and the camera focuses only on the subject in the center focus area,
- GAF/MF SETTING > FACE/EYE DETECTION SETTING is set to FACE DETECTION ON,
- HDMI output is not available,
- audio from built-in and external microphones is not output to the connected device,
- images are not displayed in the LCD monitor, and
- the AF lamp will light if the battery is low; insert a spare battery if available.
For more information on web conferencing, see the documentation for the web conference application.
GENERAL SETTINGS
Adjust settings for connection to wireless networks.
NAME
Choose a name (NAME) to identify the camera on the wireless network (the camera is assigned a unique name by default).
RESIZE IMAGE FOR SMARTPHONE H
Choose whether to resize images for upload to smartphones. Resizing applies only to the copy uploaded to the smartphone; the original is not affected.
| Option | Description |
|---|---|
| ON | Larger images are resized to H for upload. |
| OFF | Images are uploaded at their original size. |
GEOTAGGING
Choose whether location data downloaded from a smartphone are embedded in pictures as they are taken.
| Options | |
|---|---|
| ON | OFF |
LOCATION INFO
Display the location data last downloaded from a smartphone.
| Options | |
|---|---|
| ON | OFF |
rBUTTON SETTING
Choose the role played by function buttons assigned the WIRELESS COMMUNICATION function.
| Option | Description |
|---|---|
| sPAIRING/TRANSFER ORDER | The buttons can be used for pairing and selecting images for transfer. |
| rWIRELESS COMMUNICATION | The buttons can be used for wireless connections. |
INFORMATION
View the camera’s MAC and Bluetooth address.
RESET WIRELESS SETTING
Restore wireless settings to their default values.

 .
.

