.
.Camera Displays
This section lists the indicators that may be displayed during shooting.
For illustrative purposes, displays are shown with all indicators lit.
- The Electronic Viewfinder
- The LCD Monitor
- Choosing a Display Mode
- Adjusting Display Brightness
- Display Rotation
- The [DISP/BACK] Button
- The Dual Display
- Customizing Display Indicators
- Virtual Horizon
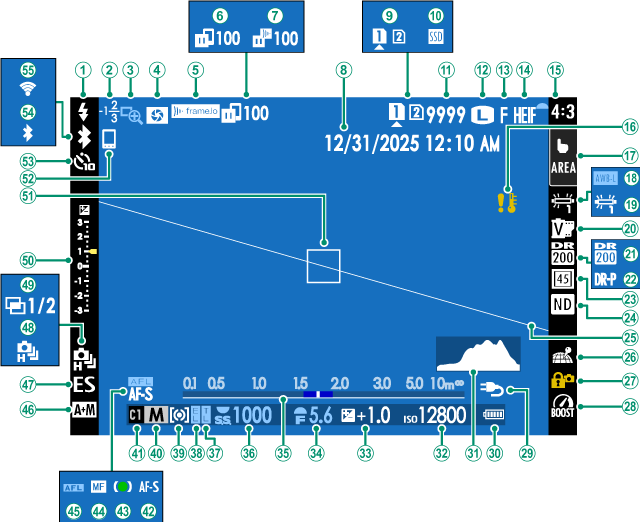
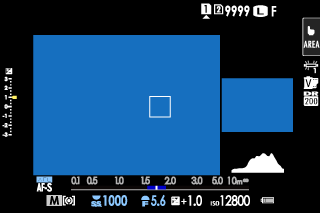
The Electronic Viewfinder
Still Photography
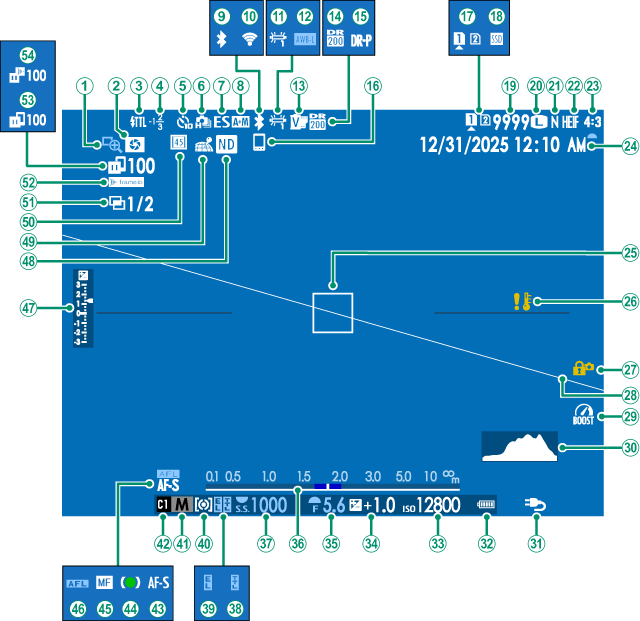
AFocus check
BDepth-of-field preview
CFlash (TTL) mode
DFlash compensation
ESelf-timer indicator
FContinuous mode
GShutter type
HAF+MF indicator 2
IBluetooth ON/OFF
JWireless connection
KWhite balance
LAWB lock
MFilm simulation
NDynamic range
OD-range priority
PBluetooth host
QCard slot options
RSSD connection status
SNumber of available frames 1
TImage size
UImage quality
VHEIF format
WAspect ratio
XDate and time
YFocus frame
ZTemperature warning
aControl lock 3
bVirtual horizon
cBoost mode
dHistogram
ePower supply
fBattery level
gSensitivity
hExposure compensation
iAperture
jDistance indicator 2
kShutter speed
lTTL lock
mAE lock
nMetering
oShooting mode
pCustom modes
qFocus mode 2
rFocus indicator 2
sManual focus indicator 2
tAF lock
uExposure indicator
vND (Neutral Density) filter indicator
wLocation data download status
xDigital teleconverter
yMultiple exposures
zFrame.io connection status
0Image transfer status
1Frame.io upload progress
Shows “9999” if there is space for over 9999 frames.
Not displayed when [ON] is selected for D[SCREEN SET-UP] > [LARGE INDICATORS MODE(EVF)].
Displayed when controls have been locked by pressing and holding the [MENU/OK] button. Control lock can be ended by pressing and holding the [MENU/OK] button again.
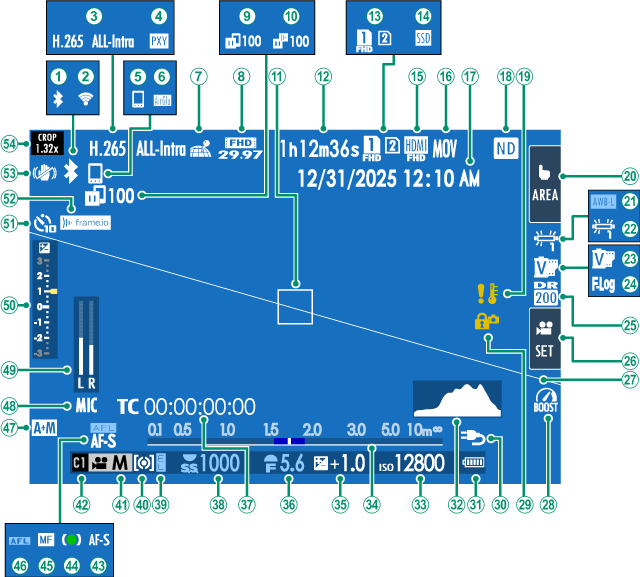
Movie Recording
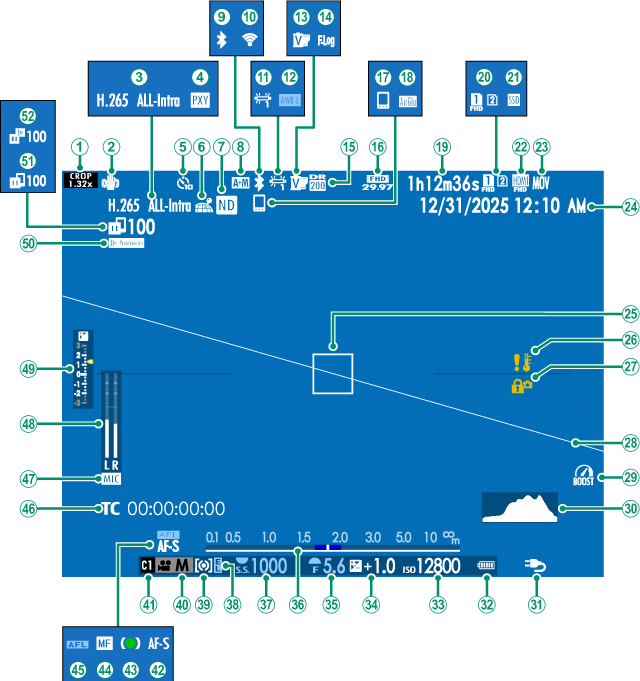
ACrop factor
BIS mode 2
CMovie compression
DProxy setting (ProRes only)
ESelf-timer indicator
FLocation data download status
GND (Neutral Density) filter indicator
HAF+MF indicator 2
IBluetooth ON/OFF
JWireless connection
KWhite balance
LAWB lock
MFilm simulation
NF-Log/HLG recording
ODynamic range
PMovie mode
QBluetooth host
RAirGlu BT connection
SRecording time available/elapsed recording time
TCard slot options
USSD connection status
VHDMI output
WFile format
XDate and time
YFocus frame
ZTemperature warning
aControl lock 3
bVirtual horizon
cBoost mode
dHistogram
ePower supply
fBattery level
gSensitivity
hExposure compensation
iAperture
jDistance indicator 2
kShutter speed
lAE lock
mMetering
nShooting mode
oCustom modes
pFocus mode 2
qFocus indicator 2
rManual focus indicator 2
sAF lock
tTime code
uMicrophone input channel
vRecording level 2
wExposure indicator
xFrame.io connection status
yImage transfer status
zFrame.io upload progress
Shows “9999” if there is space for over 9999 frames.
Not displayed when [ON] is selected for D[SCREEN SET-UP] > [LARGE INDICATORS MODE(EVF)].
Displayed when controls have been locked by pressing and holding the [MENU/OK] button. Control lock can be ended by pressing and holding the [MENU/OK] button again.
The LCD Monitor
Still Photography
AFlash (TTL) mode
BFlash compensation
CFocus check
DDepth-of-field preview
EFrame.io connection status
FImage transfer status
GFrame.io upload progress
HDate and time
ICard slot options
JSSD connection status
KNumber of available frames 1
LImage size
MImage quality
NHEIF format
OAspect ratio
PTemperature warning
QTouch screen mode 3
RAWB lock
SWhite balance
TFilm simulation
UDynamic range
VD-range priority
WDigital teleconverter
XND (Neutral Density) filter indicator
YVirtual horizon
ZLocation data download status
aControl lock 4
bBoost mode
cPower supply
dBattery level
eHistogram
fSensitivity
gExposure compensation
hAperture
iDistance indicator 2
jShutter speed
kTTL lock
lAE lock
mMetering
nShooting mode
oCustom modes
pFocus mode 2
qFocus indicator 2
rManual focus indicator 2
sAF lock
tAF+MF indicator 2
uShutter type
vContinuous mode
wMultiple exposures
xExposure indicator
yFocus frame
zBluetooth host
0Self-timer indicator
1Bluetooth ON/OFF
2Wireless connection
Shows “9999” if there is space for over 9999 frames.
Not displayed when [ON] is selected for D[SCREEN SET-UP] > [LARGE INDICATORS MODE(LCD)].
Camera functions can also be accessed via touch controls.
Displayed when controls have been locked by pressing and holding the [MENU/OK] button. Control lock can be ended by pressing and holding the [MENU/OK] button again.
Movie Recording
ABluetooth ON/OFF
BWireless connection
CMovie compression
DProxy setting (ProRes only)
EBluetooth host
FAirGlu BT connection
GLocation data download status
HMovie mode
IImage transfer status
JFrame.io upload progress
KFocus frame
LRecording time available/elapsed recording time
MCard slot options
NSSD connection status
OHDMI output
PFile format
QDate and time
RND (Neutral Density) filter indicator
STemperature warning
TTouch screen mode 3
UAWB lock
VWhite balance
WFilm simulation
XF-Log/HLG recording
YDynamic range
ZMovie optimized control 3
aVirtual horizon
bBoost mode
cControl lock 4
dPower supply
eBattery level
fHistogram
gSensitivity
hDistance indicator 2
iExposure compensation
jAperture
kTime code
lShutter speed
mAE lock
nMetering
oShooting mode
pCustom modes
qFocus mode 2
rFocus indicator 2
sManual focus indicator 2
tAF lock
uAF+MF indicator 2
vMicrophone input channel
wRecording level 2
xExposure indicator
ySelf-timer indicator
zFrame.io connection status
0IS mode 2
1Crop factor
Shows “9999” if there is space for over 9999 frames.
Not displayed when [ON] is selected for D[SCREEN SET-UP] > [LARGE INDICATORS MODE(LCD)].
Camera functions can also be accessed via touch controls.
Displayed when controls have been locked by pressing and holding the [MENU/OK] button. Control lock can be ended by pressing and holding the [MENU/OK] button again.
Choosing a Display Mode
Use D[SCREEN SET-UP] > [VIEW MODE SETTING] to choose from the following display modes. You can choose separate display modes for shooting and playback.
[SHOOTING]
| Option | Description |
|---|---|
| E[EYE SENSOR] | Putting your eye to the viewfinder turns the viewfinder on and the LCD monitor off; taking your eye away turns the viewfinder off and LCD monitor on. |
| r[LCD ONLY] | LCD monitor on, viewfinder off. |
| Q[EVF ONLY] | Viewfinder on, LCD monitor off. |
| Q[EVF ONLY] + E | Putting your eye to the viewfinder turns the viewfinder on; taking it away turns the viewfinder off. The LCD monitor remains off. |
| t[EYE SENSOR + LCD IMAGE DISP.] | Putting your eye to the viewfinder during shooting turns the viewfinder on, but the LCD monitor is used for the display of images once you remove your eye from the viewfinder after shooting. The options selected for D[SCREEN SET-UP] > [IMAGE DISP.] apply to display in the LCD monitor. This setting cannot be selected while shooting movies. |
You can also assign [VIEW MODE SETTING] to a function button and use it to switch between the EVF and LCD monitor.
Go to D[SCREEN SET-UP] > [VIEW MODE SETTING] > [SHOOTING] in the setup menu and press the [Q] button to choose the view modes available.
[PLAYBACK]
| Option | Description |
|---|---|
| E[EYE SENSOR] | Putting your eye to the viewfinder turns the viewfinder on and the LCD monitor off; taking your eye away turns the viewfinder off and LCD monitor on. |
| r[LCD ONLY] | LCD monitor on, viewfinder off. |
| Q[EVF ONLY] | Viewfinder on, LCD monitor off. |
The Eye Sensor
- The eye sensor may respond to objects other than your eye or to light shining directly on the sensor.
- The eye sensor is not available when the LCD monitor is tilted.
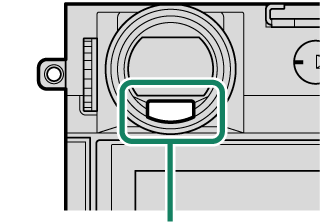
Eye sensor
Adjusting Display Brightness
The brightness and saturation of the viewfinder and LCD monitor can be adjusted using the items in the D[SCREEN SET-UP] menu. Choose [EVF BRIGHTNESS] or [EVF COLOR] to adjust viewfinder brightness or saturation, [LCD BRIGHTNESS] or [LCD COLOR] to do the same for the LCD monitor.
Display Rotation
When [ON] is selected for D[SCREEN SET-UP] > [AUTOROTATE DISPLAYS], the indicators in the viewfinder and LCD monitor automatically rotate to match camera orientation.
The [DISP/BACK] Button
The [DISP/BACK] button controls the display of indicators in the viewfinder and LCD monitor.

Indicators for the EVF and LCD must be selected separately. To choose the EVF display, place your eye to the viewfinder while using the [DISP/BACK] button.
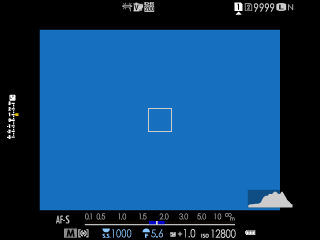
Viewfinder
Full screen
Full screen (no indicators)

Standard indicators
Standard (no indicators)

Dual display
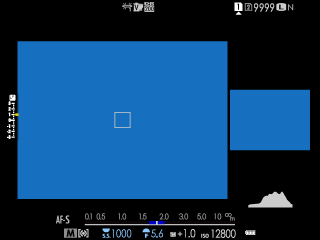
The dual display is available only when shooting still images with manual focus.
LCD monitor
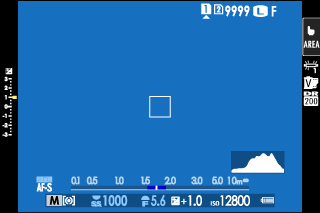
Standard indicators
Standard (no indicators)

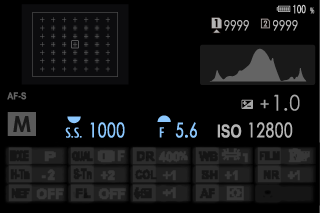
Info display
Dual display
The dual display is available only during manual focus.
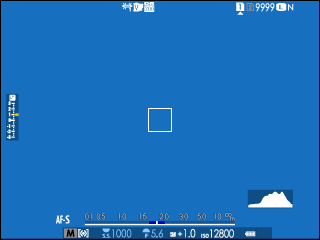
The Dual Display
The dual display consists of a large full-frame window and a smaller close-up of the focus area.
Customizing Display Indicators
Use D[SCREEN SET-UP] > [DISP. CUSTOM SETTING] to select the items shown in the full screen and standard indicators displays.
-
Select [DISP. CUSTOM SETTING].
Select D[SCREEN SET-UP] > [DISP. CUSTOM SETTING] in the setup menu.
-
Choose items.
Highlight items and press [MENU/OK] to select or deselect.
- [FRAMING GUIDELINE]
- [FOCUS FRAME]
- [FOCUS INDICATOR]
- [AF DISTANCE INDICATOR]
- [MF DISTANCE INDICATOR]
- [HISTOGRAM]
- [LIVE VIEW HIGHLIGHT ALERT]
- [SHOOTING MODE]
- [APERTURE/S-SPEED/ISO]
- [INFORMATION BACKGROUND]
- [Expo. Comp. (Digit)]
- [Expo. Comp. (Scale)]
- [FOCUS MODE]
- [PHOTOMETRY]
- [SHUTTER TYPE]
- [FLASH]
- [CONTINUOUS MODE]
- [DUAL IS MODE]
- [TOUCH SCREEN MODE]
- [WHITE BALANCE]
- [FILM SIMULATION]
- [DYNAMIC RANGE]
- [BOOST MODE]
- [FRAMES REMAINING]
- [IMAGE SIZE/QUALITY]
- [ASPECT RATIO]
- [MOVIE MODE & REC. TIME]
- [DIGITAL TELE-CONV.]
- [COMMUNICATION STATUS]
- [MIC LEVEL]
- [GUIDANCE MESSAGE]
- [NO STORAGE MEDIA WARNING]
- [DATE/TIME]
- [BATTERY LEVEL]
- [FRAMING OUTLINE]
-
Press [DISP/BACK] to save changes.
Framing Outline
Enable [FRAMING OUTLINE] to make the borders of the frame easier to see against dark backgrounds.
Histograms
Histograms show the distribution of tones in the image. Brightness is shown by the horizontal axis, the number of pixels by the vertical axis.
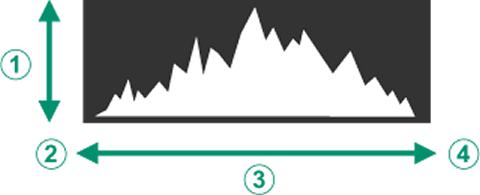
ANumber of pixels
BShadows
CPixel brightness
DHighlights
Optimal exposure: Pixels are distributed in an even curve throughout the tone range.

Overexposed: Pixels are clustered on the right side of the graph.

Underexposed: Pixels are clustered on the left side of the graph.

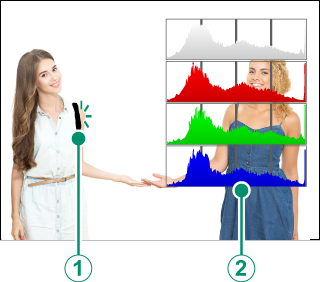
To view separate RGB histograms and a display showing areas of the frame that will be overexposed at current settings superimposed on the view through the lens, press the function button to which [HISTOGRAM] is assigned (aFunction Controls).
AOverexposed areas blink
BRGB histograms
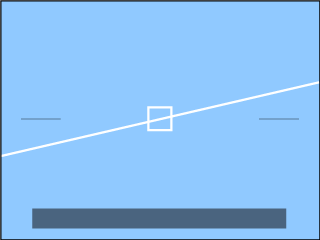
Virtual Horizon
Check whether the camera is level. The display type can be chosen using D[SCREEN SET-UP] > [ELECTRONIC LEVEL SETTING]. Use the virtual horizon to level the camera when mounting it on a tripod or the like.
2D
3D
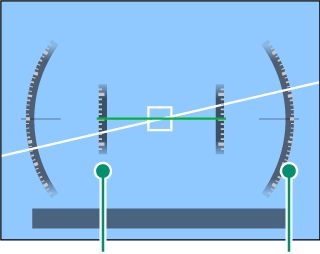
Pitch Roll
- [OFF]: The virtual horizon is not displayed.
- [2D]: A white line shows the amount the camera is tilted left or right. The line turns green when the camera is level. The line may vanish if the camera is tilted forward or back.
- [3D]: The display shows whether the camera is tilted left or right and forward or back.
[ELECTRONIC LEVEL SWITCH] can be assigned to a function button and the button then used to switch between the 2D and 3D displays.