.
.USER SETTING
Adjust basic camera settings.
Swipe left on the LCD monitor, and then tap D(SET UP) on the secondary LCD monitor to select USER SETTING on the LCD monitor.
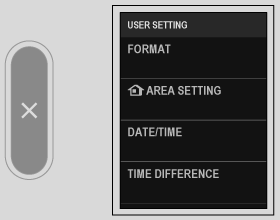
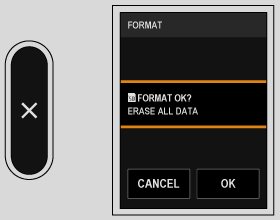
FORMAT
To format a memory card:
-
Select DUSER SETTING > FORMAT in the D(SET UP) tab.
-
A confirmation dialog will be displayed.
-
Tap OK to format.
The format will not be performed if you tap CANCEL on the confirmation screen or tap v on the secondary LCD monitor.
All data—including protected pictures—will be deleted from the memory card. Be sure important files have been copied to a computer or other storage device.
Do not open the battery-chamber cover during formatting.
bAREA SETTING
Adjust settings for your current time zone.
AREA SETTING
Choose your time zone from a map.
DAYLIGHT SAVINGS
Turn daylight saving time on or off.
| Option | Description |
|---|---|
| ON | Daylight saving time on. |
| OFF | Daylight saving time off. |
DATE/TIME
To set the camera clock:
-
Select DUSER SETTING > DATE/TIME in the D(SET UP) tab.
-
Set the date and time.
-
Tap v on the secondary LCD monitor to set the date and time.
TIME DIFFERENCE
Switch the camera clock instantly from your home time zone to the local time at your destination when traveling. To specify the difference between your local and home time zone:
Use bAREA SETTING to choose your home time zone before selecting a local time zone using gLOCAL.
-
Tap the w icon.
-
Select the area of your destination.
Select ON to enable daylight saving time.
-
Tap v on the secondary LCD monitor.
To set the camera clock to local time, highlight gLOCAL and press MENU/OK. To set the clock to the time in your home time zone, select hHOME.
| Options | |
|---|---|
| gLOCAL | hHOME |
If gLOCAL is selected, g will be displayed in yellow for about three seconds when the camera is turned on.
Qa
Choose a language.
FIRMWARE UPDATE
Use the firmware stored on a memory card to update the firmware for the camera (aFirmware Updates).
ACTIVITY RECORD
You can automatically record your shooting activities using the camera. Use FUJIFILM’s network services to check your daily shooting activities in a diary format or as summary information.
In our network service, you can not only check your daily shooting activities in a diary format, but also edit them and receive notifications from FUJIFILM. To use our network service, you need to use the following two apps.
- Smartphone app (aConnecting to Smartphones (Bluetooth))
- FUJIFILM XApp
RESET
Reset each menu option to default values.
-
Select the menu you want to reset.
Option Description MENU RESET The ASHOOTING SETTING, BMOVIE SETTING, HIMAGE QUALITY SETTING, GAF/MF SETTING, PAUDIO SETTING, and DIVIDING LINE SETTINGS in the setup menu will be reset. SET-UP RESET Reset all setup menu settings other than DATE/TIME, bAREA SETTING, and TIME DIFFERENCE to default values. INITIALIZE Reset all settings to default values. -
Tap OK on the confirmation screen.
SUPPORT WEBSITE
Display the QR code for the support website of the camera. Use your smartphone or another device to scan the code to access the website.
REGULATORY
To view electronic copies of the product model number, and other certificates, select DUSER SETTING > REGULATORY in the setup menu.
SHUTTER COUNT
View the approximate number of times the shutter has been released.
Other actions may also increment the counter, for example turning the camera off or choosing playback mode.