.
.[USER SETTING]
Adjust basic camera settings.
Swipe left on the LCD monitor, and then tap D([SET UP]) on the secondary LCD monitor to select [USER SETTING] on the LCD monitor.
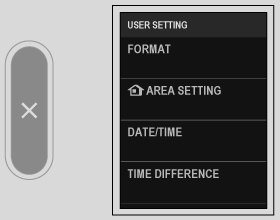
[FORMAT]
To format a memory card:
-
Select D[USER SETTING] > [FORMAT] in the D([SET UP]) tab.
-
A confirmation dialog will be displayed.
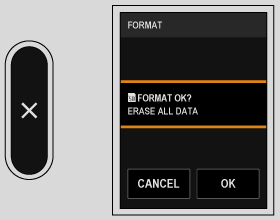
-
Tap [OK] to format.
The format will not be performed if you tap [CANCEL] on the confirmation screen or tap v on the secondary LCD monitor.
All data—including protected pictures—will be deleted from the memory card. Be sure important files have been copied to a computer or other storage device.
Do not open the battery-chamber cover during formatting.
b[AREA SETTING]
Adjust settings for your current time zone.
[AREA SETTING]
Choose your time zone from a map.
[DAYLIGHT SAVINGS]
Turn daylight saving time on or off.
| Option | Description |
|---|---|
| [ON] | Daylight saving time on. |
| [OFF] | Daylight saving time off. |
[DATE/TIME]
To set the camera clock:
-
Select D[USER SETTING] > [DATE/TIME] in the D([SET UP]) tab.
-
Set the date and time.
-
Tap v on the secondary LCD monitor to set the date and time.
[TIME DIFFERENCE]
Switch the camera clock instantly from your home time zone to the local time at your destination when traveling. To specify the difference between your local and home time zone:
Use b[AREA SETTING] to choose your home time zone before selecting a local time zone using g[LOCAL].
-
Tap the w icon.
-
Select the area of your destination.
Select [ON] to enable daylight saving time.
-
Tap v on the secondary LCD monitor.
To set the camera clock to local time, highlight g[LOCAL] and press [MENU/OK]. To set the clock to the time in your home time zone, select h[HOME].
| Options | |
|---|---|
| g[LOCAL] | h[HOME] |
If g[LOCAL] is selected, g will be displayed in yellow for about three seconds when the camera is turned on.
Qa
Choose a language.
[FIRMWARE UPDATE]
Use the firmware stored on a memory card to update the firmware for the camera (aFirmware Updates).
[ACTIVITY RECORD]
You can automatically record your shooting activities using the camera. Use FUJIFILM’s network services to check your daily shooting activities in a diary format or as summary information.
In our network service, you can not only check your daily shooting activities in a diary format, but also edit them and receive notifications from FUJIFILM. To use our network service, you need to use the following two apps.
- Smartphone app (aConnecting to Smartphones (Bluetooth))
- FUJIFILM XApp
[RESET]
Reset each menu option to default values.
-
Select the menu you want to reset.
Option Description [MENU RESET] The A[SHOOTING SETTING], B[MOVIE SETTING], H[IMAGE QUALITY SETTING], G[AF/MF SETTING], P[AUDIO SETTING], and [DIVIDING LINE SETTINGS] in the setup menu will be reset. [SET-UP RESET] Reset all setup menu settings other than [DATE/TIME], b[AREA SETTING], and [TIME DIFFERENCE] to default values. [INITIALIZE] Reset all settings to default values. -
Tap [OK] on the confirmation screen.
[SUPPORT WEBSITE]
Display the QR code for the support website of the camera. Use your smartphone or another device to scan the code to access the website.
[REGULATORY]
To view electronic copies of the product model number, and other certificates, select D[USER SETTING] > [REGULATORY] in the setup menu.
[SHUTTER COUNT]
View the approximate number of times the shutter has been released.
Other actions may also increment the counter, for example turning the camera off or choosing playback mode.